How to Password Protect a Word Document?
Last Updated on 2 months by Touhid
Today, we’re here to show you how to password protect a Word document. We’ll show you step-by-step instructions on how to protect your Word document file with a password on Windows and Mac.
You can secure all sensitive documents by giving a password. Every time you must enter your password to open your Word document. The best way to protect your Word document is by adding a password.
Table of Contents
How to Password Protect a Word Document?
As we know, the password is very important for an account which may ensure that an unauthorized person can’t access your account and data. If you use a strong password, change it regularly, and don’t share it with others, then you’re almost safe to protect your data.
When you apply a password to protect a Word document, it means you’re encrypting your document with a password. Without the password, you can’t open your Word document or decrypt it to gain access.
Microsoft Office has a great security feature on how to password protect a Word document. This security feature may ensure the protection of Word documents such as Word, Excel, and PowerPoint.
It is also noted, that if you lose or forget your password then you can’t recover it. So, you must carefully handle the password to protect a document on Windows and Mac.

Password Protect a Word Document in Windows
There are simple steps to encrypting your Word document with a password on a Windows computer. When you complete these steps, you’ll be required to enter a password to open the documents.
For your information, passwords are case-sensitive. So, before setting a password in your Word document, you must create a strong password.
Now, the steps for how to password-protect a Word document are as follows:
Step 1: Open your document file (such as Word document, PowerPoint, or Excel)
Step 2: In the Word document file, you’ll see a different menu in the top section. Click on the File menu.
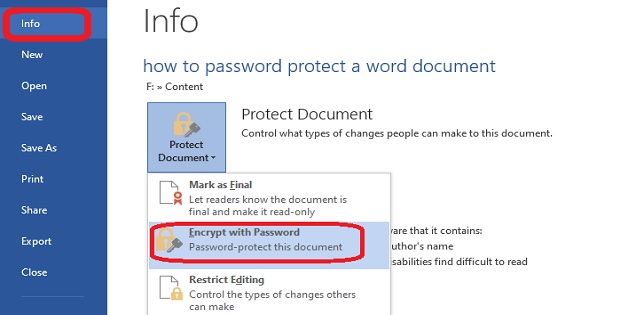
Step 3: Now, click on the “Info” menu. Here you’ll see some options on the right side and click the Protect document menu.
Step 4: After clicking on the Protect document option, select the “Encrypt with password” option.

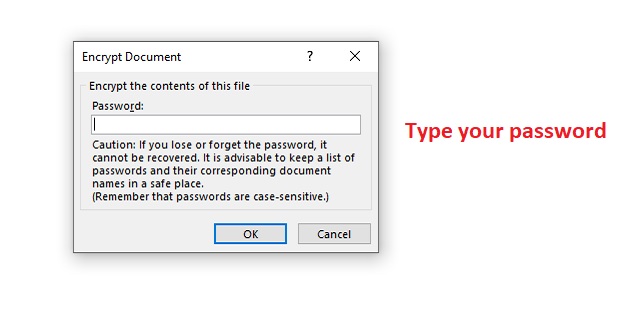
Step 5: Now, type a password to secure your document file and click on the “OK” button.

Step 6: Again, re-enter your password to confirm the password and click on the “OK” button.
When you’ve completed these steps on a Word document file, you need to enter your given password to open the document. Without this password, you can’t open the encrypted document, so keep your password in a secure place.
Remove Password from a Document in Windows
There are also simple steps to remove a password from your Word document in Windows. After completing these steps, you’ll not be required to enter a password to open your Word document.
Now, the steps for removing a password from password protected Word document are as follows:
Step 1: Open your document file (such as Word document, PowerPoint, or Excel).
Step 2: Type your current password and click OK to open the file.
Step 3: Click on the File menu in your Word document file.
Step 4: Now, click on the “Info” menu. On the right side click on the Protect document option.
Step 5: After clicking on the Protect document option, select the “Encrypt with password” option.
Step 6: Now, clear the given password to remove the password from your protected Word document file.
Step 7: Finally, click on the “OK” button.
How to Password Protect a Word document on a Mac?
Already, we have seen how to password-protect a Word document for Windows Computer. Now, we’ll show you how to password-protect a document for Mac. Here are the steps to protect and/or encrypt your document for Mac with a password.
Step 1: Open your Word document file and click on the Review tab.
Step 2: Select the Protect Document tab and a Password Protect window will open.
Step 3: Now, in the security section, enter a passphrase to open and access the document.
Step 4: Click on OK. Again, re-enter the same password to confirm it.
Step 5: After re-enter the same password, click on OK.
Step 6: Finally, the document is encrypted, and a password is required to open it.
How to Remove Password from a Document on Mac?
The process of removing a password from a Word document on a Mac is the same as adding a passphrase in a document on a Mac.
However, we have provided the steps to remove a password from a Word document on Mac as follows:
Step 1: Open your Word document file and click on the Review tab.
Step 2: Select the Protect Document tab and a Password Protect window will open.
Step 3: Now, in the security section, clear or delete the passphrase.
Step 4: Click on OK.
Step 6: The document is free to open and no longer requires a password.
After completing these steps you’ll not be required to enter a password to open your Word document.
Why Would You Password Protect a Word Document?
In the previous sections, we’ve seen how to password protect a Word document and how to remove it on Windows and Mac systems. Now, we’ll focus on why you need to password-protect a Word document.
Password protection is a security feature in Microsoft Office (Word, Excel, and PowerPoint) that is typically designed to prevent unauthorized edits or modifications to documents. No one can edit or change your document if you set a password to protect a document.
If you want to send sensitive documents to someone then it is required or will be better to set a password on that document.
A document that is not protected by a password and contains critical information, that document may be compromised or modified by unauthorized persons. That’s why adding a password to your Word document is required to keep data secure.
Conclusion
Finally, the best way to protect your Word document in Windows or Mac is by adding a password. In addition, if you forgot or lost the password, then you can’t recover the password and you’re unable to open the document. Because there is no support service to retrieve the password in Microsoft.
In this article, we’ve shown you step-by-step how to password protect a Word document; hope this will be helpful for you.


